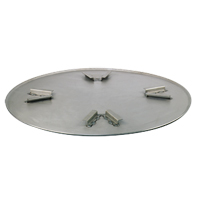
 Figure 1. Pans are circular metal disks with an upturned edge, clipangles or slot/pin for blade attachment and a bottom profile thatvaries from flat to slightly curved. To attach a pan, lay it on theconcrete, then set the machine on the pan. Start the machine and slowlyrotate the blades until they engage with the clip angles. Figure 1. Pans are circular metal disks with an upturned edge, clipangles or slot/pin for blade attachment and a bottom profile thatvaries from flat to slightly curved. To attach a pan, lay it on theconcrete, then set the machine on the pan. Start the machine and slowlyrotate the blades until they engage with the clip angles. |
What Are Pan Floats? Pans are circular metal disks (Fig. 1)with an upturned edge, clip angles for blade attachment and a bottom profile that varies from flat to slightly curved. A flat pan's edge rises very little during floating; at most, the outer 1 inch of radius doesn't touch the floor. The edge of a slightly curved pan rises more prominently, with the outer 3 to 4 inches of radius above the floor. Some finishers prefer the slightly curved pan because the reduced pan to concrete contact cuts drag and eases handling of walk-behind machines. Less drag also results in less wear on both walk-behind and ride-on trowels. However, finishers sacrifice some surface flatness when using the curved pans.
Pan diameter ranges from 24 to 48 inches to match various power trowel sizes, and pan thickness ranges from 10 to 12 gauge. Most pans can float 125,000 to 175,000 square feet of floor surface before wearing out. To obtain better pan wear on riding trowels, some finishers rotate pans like car owners rotate tires. Pan costs range from £40 to £80, depending on size.
Pans can be attached to combination or trowel blades. When pan floating is completed, finishers can remove the pans and immediately start troweling. To attach a pan to a trowel, lay the pan on the concrete, then set the machine on the pan. Start the engine and slowly rotate the blades until they engage the clip angles welded to the top of the pan. For a two shaft ride-on trowel, each set of blades rotates in a different direction. When viewed from the top, the blades on the right typically rotate counter clockwise and those on the left rotate clockwise. This requires the right and left pans to have clip angles mounted differently. Remember this when positioning the pans, so the open end of the clip angle will be in the correct position to receive the blades.
Make sure the blades are flat when the pan is rotating. Running a pan attached to tilted blades can wear a hole in the pan in as little as an hour. |
| Be Aware of Pan Friction Pans have more surface area than float blades, thus creating more friction on the concrete surface. Because this friction puts more torque on the rotor, pans rotate at fewer revolutions per minute than float blades.
Be Aware of Pan Friction. Pans have more surface area than float blades, thus creating more friction on the concrete surface. Because this friction puts more torque on the rotor, pans rotate at fewer revolutions per minute than float blades. Between the pan and the fresh concrete it also creates more gearbox strain. Be sure to follow the manufacturer's recommendations on gearbox maintenance, and be prepared for more gearbox wear.
Although the increased surface area of a pan leads to more gearbox strain and fewer rpm, it improves productivity. Because of the greater surface area, it takes less time to float an area. Experienced contractors can increase productivity 15% or more by using float pans instead of float blades on the same machine.
Pan friction, however, limits the size of the walk-behind power trowel that a finisher can use. As the float pan alternates between wet and dry fresh concrete areas, it grabs the concrete surface and causes the machine to jerk. Pans Give Flatter Results there are several reasons for this increase in floor flatness:
• Pans are wider and flatter than float blades.
• Pans minimize finishing variations caused by bent float arms and blades.
• The lower contact pressure of pans causes less dishing, or troughing, and less elevation difference between the edge and center of the trough. |
|
| Timing of Pan Floating Many variables affect concrete setting and make it difficult to set a definite time to begin floating:
Bleedwater.Floating should never be done if bleed water is on the surface.Although some finishers float early, while bleedwater is still present,the benefit of this early start time isn't worth the potential risk,since floating bleedwater into the surface can cause dusting and scaling. Because of the pan float's increased productivity and superiorperformance in breaking open a concrete surface (see box on page 783),there should be no reason for finishers to get on the concrete whenbleedwater is present.
000' Concrete rigidity. ACI 302 (Ref. ) indicates that a slab surface is sufficiently rigid for power floating with the lightest machine available when the concrete will support a finisher on foot without more than approximately a ¼inch indentation, and the weight of the machine will neither dig in nor disrupt the levelness of the surface.Because they produce less contact pressure, ride-on power trowels with pans can begin floating earlier than ride- on machines with floatblades.
The pan's ability to break open a surface and increase productivity also allows finishers to wait longer to get on a slab. Thus, using panson ride-on machines widens the time window for power floating. If the slab becomes too stiff, you can add extra weight to the finishingmachine to extend the time available for power floating.
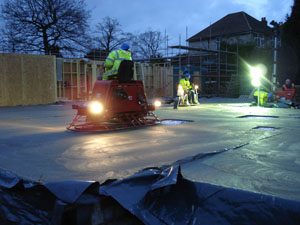
Figure 3. For a ride-on machine, most finishers judge when to pan float by estimating the height of the mortar ridge created between the non overlapping pans. A ride-on machine equipped with pans should create a mortar ridge height from if to 3 inch. |
Though using pans on walk-behind power floats can also extend the time available for power floating by allowing workers to get on slabs earlier, an early start usually isn't practical since finishers leave footprints in the concrete. When high floor flatness numbers are required, it's extremely critical to minimize the surface disruption caused by footprints.
Placement order. Normally concrete is ready for power floating in the same order in which it's placed. Certain areas, however, may be ready for power floating before others. Areas that dry faster include surfaces adjacent to screed guides, edge forms, blockouts, walls and columns as well as surfaces exposed to sun and wind. Low slump concrete will also set faster. The finisher foreman should watch for areas that set faster than the overall placement and assign finishers to handle these areas first.
Paste for re straightening. When ''sigh flatness numbers are specified, the floating operation is typically started earlier to bring up enough mortar for the re straightening operations needed to achieve the specified flatness. Because of a trend toward flatter floors, finishers usually start power floating as soon as possible (at the time when footprints are ¼ inch deep).
A notable exception to this practice is when contractors use laser guided self-propelled screeds, which produce very flat floors without much re straightening. Most finishers wait longer to power float these slabs. Getting on the concrete earlier lowers the floor flatness below that provided by the laser guided screed, thus requiring added re straightening efforts to achieve the desired result.
Mortar ridge height. Since pans are used on non overlapping ride-on power machines, a mortar ridge (windrow) is created between the pans. Use the height of this ridge to estimate when to start pan floating (Fig. 3). Some finishers start floating early enough to create a 1-inch high mortar ridge between the pans. Other finishers wait, creating a ridge of ¼inch or less. Although high quality floors can be produced with either ridge height, labor intensive re straightening efforts are required when the ridge is too high (too much mortar) or too low (not enough mortar). Therefore, most contractors wait until the pan float creates a ¼- to ½-inch ridge height. To achieve this height range, start pan floating when you leave about a ?-inch-deep footprint in the concrete.
Turn marks. When concrete is too soft, a sharp turn with a ride-on machine causes the pans to dig into the floor, creating a divot at each machine turn. If this happens, wait until the concrete stiffens further or tell finishers to slow the turn so divots don't cause localized decreases in floor flatness. Some finishers eliminate turns on the first float pass by floating forward then overlapping with a backward pass.
Placement conditions. Jobsite conditions during concrete placement also affect the timing of power floating. On hot, windy days finishers may worry about the slab setting too quickly and start floating earlier. Inexperienced finishers, a manpower shortage or machine breakdowns may also motivate the finisher foreman to begin floating earlier than planned. Planning ahead for these potential situations will help minimize the effect they have on determining the timing of power floating. |
| Pan Floating Techniques Multiple float passes usually are needed to prepare a floor for troweling. Each float pass is done for a specific purpose. Make sure finishers understand the proper floating procedures, and monitor operations to ensure compliance. Direction and pattern. Always make the first float pass perpendicular to the direction of screeding, and make subsequent float passes perpendicular to the direction of the previous pass. Each pass of the pans in alternating directions refines the flatness of the floor until the concrete surface stiffens to the point that it can no longer be moved. Floating in only one direction creates a wave, and repeated float passes in only one direction accentuate the wave, which is difficult to remove during re straightening.
Overlap each pass by one half the pan diameter to minimize the depth of the trough left by each float pass. After the first pass, the finisher centers one rotor of the machine over the mortar ridge. Each pan erases the ridge left by the previous pass.
Beginner mistakes. Inexperienced finishers don't recognize the importance of floating in a specific direction and in making the second pass perpendicular to the first. Cowboy floating—going full speed in any and every direction—may be fun but won't produce as flat a floor.
Follow the direction and pattern set by the finisher foreman, and face the concrete that you are floating. A forward/backward pass combination is effective on the first float pass to minimize the effects of turns; after that use a forward turn forward pass combination. A double ride-on machine is designed to cover two pan widths per pass and allow the operator to see the concrete to be finished next. Don't spend a lot of time going sideways.
Avoid repeatedly going over the same spot, and don't let the machine dig a hole by sitting in one spot too long. The hole will be harder to fill and flatten during re-straightening. Number of passes. The number of float passes needed can vary depending on the concrete, weather conditions, machine size and floor flatness requirements. Always work in two directions, transverse and longitudinal, to avoid floating a prominent wave into the floor. Two pan float passes is the minimum number for a slab, with four being more common. The total number of float passes should always be a multiple of two.
Switching from floating to troweling. When to switch from pan floats to trowel blades often depends on how many machines and finishers are available, how many square |
feet of floor are ready for floating and troweling, how fast the concrete is stiffening and how experienced the finishers are. Some finishers use the higher surface area pans longer—right up to the start of the burnished finish—before switching to combination or trowel blades. Using pans up to the start of the burnished finish may help minimize chatter marks caused by inexperienced finishers who routinely tilt the trowel blades too early. This approach decreases the life of the pans but increases the life of the combination or trowel blades. Floating speed. Ride-on machines are easier to control when they are running at full speed, so it's usually better to have the float pan turning at maximum rpm. However, throttle down on the first float pass. If you're running at full speed and your timing isn't right(concrete is too soft or plastic) or you hit a wet spot, you can move the surface mortar, making the floor less flat. You can wait longer,but if you have a large area to finish, it might be better to get on the surface at a reduced speed so you can start the first float pass. Floating edges. If done properly, machine floating the slab edges at least once before the hand finisher begins edge work can save a lot of hand labor. If the edges are low and need material brought to them, use a ride-on machine on a forward pass along the edge, with the float pan on or over the edge form. If the edges don't need material or if you aren't sure, make a backward pass with the ride-on machine. Don't ride over adjacent concrete; it takes
too long to clean off the resulting concrete buildup.
After the hand finisher checks edge levelness and corrects any low spots with a hand float, use the ride-on machine on a backward pass along the edges. Start the first backward pass about 2 inches in from where the finisher stopped floating. On subsequent backward passes along the edge, move in 2 inches on each pass. A forward pass along the edges causes the concrete surface to raise, resulting in more handwork. A backward pass doesn't raise the surface, so the hand finisher needs to hit the edges only once. References 1. ACI 302.1R-96, Guide for Concrete Floor and Slab Construction, American Concrete Institute, Farmington Hills, Mich., 1996.
2. Bruce A. Suprenant, "Troubleshooting Crusted Concrete," Concrete Construction, April 1997, pp. 375-378.
3. Bob Simonelli is a precision flooring consultant for Allen Engineering, Paragould Ark. |


 Pan floats, or float disks, attached to the blades of walk-behind or nonoverlapping ride-on power
trowels are increasing in use. Contractors who have been using float pans for more than four years are strong supporters of their Increased productivity giving you..
Pan floats, or float disks, attached to the blades of walk-behind or nonoverlapping ride-on power
trowels are increasing in use. Contractors who have been using float pans for more than four years are strong supporters of their Increased productivity giving you..

The information below is required for social login
Sign In
Create New Account